|
|
|
|
|
|
|
|
|
|
|
|
In the documentation below, advanced topics are described in this smaller font size.
The annotations themselves - Annotations will be shown overlayed on the images regardless of magnification and in both page and thumbnail views.
 Annotation count -
The title bar of the document (see
sample at right) will show a count of the number of annotations in the
document, e.g., 2 Annotations.
Underlying image - If the document consists of annotations
overlayed on a separate image file, the URL of the underlying image
file is given next to a paper clip icon ( ). Clicking on the paper clip causes the
browser to a open a new window viewing this underlying image file.
Annotation check box - A check box next to the annotation count allows you to hide all the annotations.
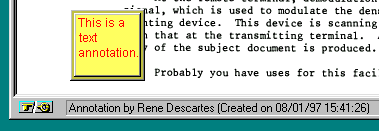 Status line - Placing the mouse cursor over an
annotation highlights the annotation and may cause the status line at
the bottom of the browser to display a "tip message" (as depicted at
right).
Pop-ups, Sound, and Hyperlinks
| Capability | Icon |
|---|---|
| Text pop-up | |
| Sound attachment | |
| Hyperlink |
![]() The figure at left shows an annotation with associated text
pop-up, sound attachment, and hyperlink, with the pop-up box displayed
after clicking on the annotation.
The figure at left shows an annotation with associated text
pop-up, sound attachment, and hyperlink, with the pop-up box displayed
after clicking on the annotation.
Hyperlinking
When an annotation has an associated hyperlink, clicking on the
annotation will cause the browser to go to the destination hyperlink.
When an annotation has both a hyperlink and a text or sound
attachment, clicking on the annotation does not cause the browser to
go immediately to the destination, for the text or sound attachments
would then be inaccessible. Rather, the annotation inspector is popped up, and a button
in the inspector allows for going to the destination.
The Annotation Inspector
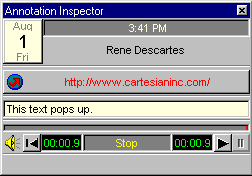 When an annotation has
a text pop-up attachment or sound attachment, clicking on the
annotation will pop up an "annotation inspector", which displays the
text and/or controls for playing back the sound. (If there is a sound
attachment, it will be played as well.) A sample annotation inspector
for the annotation above is shown at right.
The annotation inspector, like all of the inspector dialog boxes in CPC View, has a simple internal help facility. The line at the bottom of the annotation inspector provides a "tip" describing the content or function of whatever part of the inspector the mouse is over.
The annotation inspector displays the date and time that the
annotation were created and the name of the person who added the
annotation. (To change the name associated with your annotations use
the View/Preferences option in the right mouse menu.) If there is a text
pop-up attachment, the text will appear, and if there is a sound
attachment, controls will appear to play back the sound. If there is
a hyperlink associated with the annotation, a button marked with the
hyperlink icon (![]() ) will appear; clicking
on the button causes the browser to go the hyperlinked destination.
) will appear; clicking
on the button causes the browser to go the hyperlinked destination.
Authoring Annotations
Entering Annotation Mode
 You must enter
Annotation Mode to compose new annotations. (You can view annotations
in any mode.) To enter Annotation Mode, click on the pencil button in
the "Mouse"
control section of the toolbar. (Or, use the "Mouse/Annotate"
option on the right mouse menu.)
The Annotation Directory
The very first time you enter Annotation Mode, CPC View will prompt you for the local directory in which to automatically and invisibly store annotations that you make to documents. Select a directory. Once you have selected a directory, CPC View will remember it, and you will not be asked again.
To change the directory for automatic annotation storage,
use the View/Preferences option in the
right mouse menu.
The Annotation Toolbar
While you are in Annotation Mode, a new toolbar appears at the bottom of the window.

The controls in the annotation toolbar can be reconfigured,
just like the controls in the main
toolbar.
The Palette Controls
 The left-most group of
controls, labeled "Palette", contains a variety of drawing tools. To
add an annotation, select one of the tools in the palette by clicking
on it with the left button. You can then add annotations to the image
by dragging the mouse over the document.
There are four basic types of annotations:
You can also use the right mouse menu on the
palette buttons to change the properties of the palette tools
themselves.
General annotation properties
 All of the inspectors allow control
of properties of the "paper" on which the annotation is drawn, that
is, the background of the bounding box of the annotation. The color
and transparency of the paper can be controlled, as well as the type of
border (shadow, inset, embossed, none).
In addition, all allow control of the actions associated with the annotation, that is, text pop-up, sound attachments, hyperlinks, and status line messages. These are controlled with a set of four tab items at the bottom of the inspector dialog.
 The text action tab
item allows you to edit the text that will be popped up in the
annotation inspector when the annotation is
clicked on.
Clicking on the small book icon to the right of the text area pops
up a list of previously used pop-up text items. You can click on them
to insert them.
 The hyperlink
action tab item allows you to add the URL of the hyperlink
destination for this annotation.
A convenient way to generate this URL when the destination is a document viewable by CPC View (perhaps a different page of the current document) is to use the "Document/Copy URL" option from the right mouse menu. This copies the current URL so that it can be pasted into the URL area; a "Paste" option will be in the right mouse menu when the cursor is in the URL area.
Clicking on the small book icon to the right of the URL area pops
up a list of previously used destination URLs. You can click on them
to insert them.
 The sound action
tab item contains controls as for a tape recorder, for recording and
playback of the sound attachment.
 The tip action tab
item allows you to add text to be displayed as a tip on the browser's
status line when the mouse is over this annotation. (By default, the
tip used contains the date, time, and author of the annotation, as
shown above.
Clicking on the small book icon to the right of the text area pops
up a list of previously used tip messages. You can click on them
to insert them.
Text annotation properties
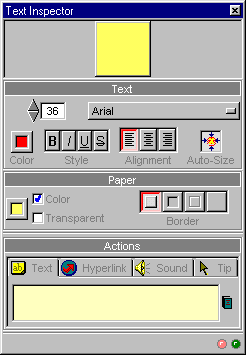 The "Properties" menu
item for a text annotation pops up the "text inspector" (depicted at
right), which allows you to control the font, size, color, and style
of the text. In addition, the actions and paper properties can be
controlled as described above.
Box annotation properties
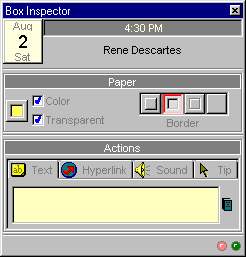 The "Properties" menu
item for a box annotation pops up the "box inspector" (depicted at
right). It allows control of the actions and paper properties can be
controlled as described above.
Circle annotation properties
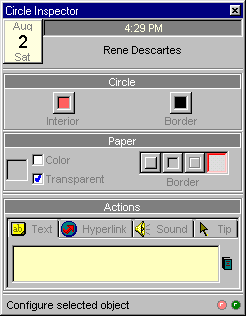 The "Properties"
menu item for a circle annotation pops up the "circle inspector"
(depicted at right), which allows you to control the font, size,
color, and style of the text. In addition, the actions and paper
properties can be controlled as described above.
Line annotation properties
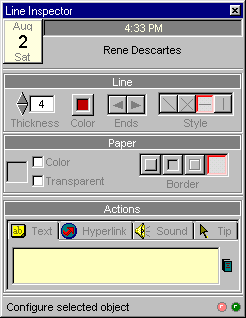 The "Properties" menu
item for a line annotation pops up the "line inspector" (depicted at
right), which allows you to control the line thickness and color, the
addition of arrowheads at either end of the line, and the relation of
the line to the annotations bounding box (single diagonal, both
diagonals, horizontal, or vertical. In addition, the actions and
paper properties can be controlled as described above.
Freehand annotation properties
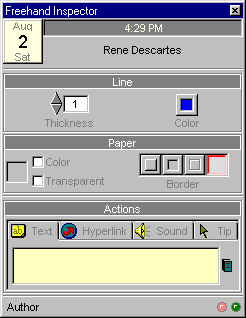 The "Properties"
menu item for a freehand line annotation pops up the "freehand
inspector" (depicted at right), which allows you to control the line
thickness and color. In addition, the actions and paper properties
can be controlled as described above.
Adding new palette items
You can make any annotation into a new palette item by clicking the
right mouse button on the annotation and selecting the "Edit/Add to
Palette" option on the right mouse menu. This will place a miniature
copy of the annotation in the palette, which acts as a new palette
tool for adding copies of this annotation. For instance, you might
add a new tool for placing the text "Approved" in large red letters.
Added palette items are persistent; they stay available from one
session to the next.
Manipulating annotations
To select an annotation, click the left mouse button on it. A red border with blue control points will appear around the annotations bounding box.
To resize a selected annotation, drag the blue control points.
To move a selected annotation, drag starting within the bounding box itself.
To edit a text annotation,double-click on the annotation.
The Edit Controls
 The center group of controls,
labeled "Edit", contains buttons to cut, delete, and copy
annotations. Additionally, the CPC View annotation editor maintains a
complete undo/redo list of all changes to the document during the
current session. The counter-clockwise arrow will undo the most recent
change; the clockwise arrow will redo the most recent change that was
undone. Clicking repeatedly on the undo button will undo more and
more of the changes.
The Clipboard
 To the right of the
"Edit" group is the clipboard. Annotations can be moved to teh
clipboard by cutting or copying them. Whenever an annotation is on
the Windows clipboard, a small small rendering of it is displayed over
the Clipboard icon. To paste the annotation, click on the clipboard or
use the "Insert" menu item on the right-mouse menu.
Clicking on the small book icon to the right of the clipboard pops
up a list of all the annotations that have been placed on the
clipboard in the current session. You can click on them to insert
them.
The Save Controls
 In general, CPC View will
automatically save your annotations to files in the Annotation
Directory you selected. The files are saved such that the next time
you view the same URL, the annotations will be automatically
loaded. While CPC View is in its automatic save mode, the text in the
"Save" group will display "<automatic>".
You can also save annotations explicitly. Click on the button to
the right of the text (or the text itself) to select a file in which
to save the annotations. Explicitly saved annotations are If your machine has MAPI installed (for instance, if you run
Microsoft Exchange), there will be an email button in the save
group. Use this button to email annotations. (Note: The URL of the
document you are annotating must be accessible to the email receiver;
the document itself is not included in the email.)
Viewing and Changing Preferences
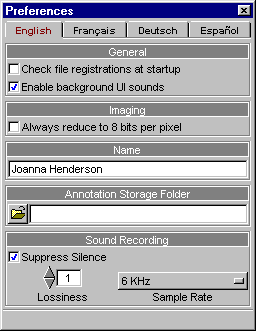 Select the
"View/Preferences" item from the right
mouse menu to control annotation preferences including the
Annotation Directory, the name that is used to identify the author of
the annotations, and various sound recording parameters.
© 1998-1999 Cartesian Products, Inc.
Contact Cartesian